Connecting to Data Using Alternative Credentials
One
of the reasons for creating a central library of trusted data
connections is to allow administrators to identify specific user
credentials for each connection rather than using the Windows
credentials of the calling user. So far, our connection is still set up
to use Windows authentication, so let’s take a quick look at how we can
change this to use specific credentials.
Before
we can change our connection to use specific credentials, we need to
set up the credentials in question. Create a new local user account
named testuser, and give this account read-only access to our sample
database.
Within
SQL Server Management Studio, add a new Login for our testuser account.
This can be achieved by expanding the Security node, right-clicking the
Logins node, and then selecting New Login from the context menu.
In the Login - New dialog, enter details of our testuser account in the Login Name textbox. Type the default database as AdventureWorks.
Switch to the User Mapping page and map our account to the db_datareader role for the AdventureWorks database, as shown:
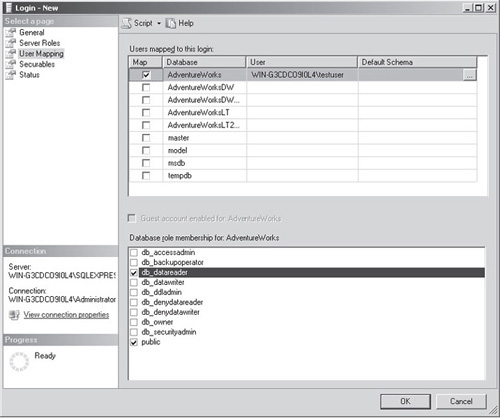
Click OK to complete the process.
Now
that we have a created specific user account with the appropriate
permissions to our database, we can look at how these permissions can be
used within Excel Services. Three possibilities exist for using
specific credentials within Excel Services:
Embedded in Connection String
We could embed
credentials in the connection string that we used when creating the data
connection. This has an obvious drawback in that the username and
password are freely visible to anybody with access to view the data
connection. Furthermore, this won’t allow us to use a specific Windows
user account.
No Credentials
This option isn’t as crazy as it
sounds. When a data connection is created and the authentication type is
set to None, Excel Services uses default credentials to connect. This
account is known as an “unattended service account” and is configured
using the Secure Store Service.
Secure Store Service Account
The Secure Store Service
provides a secure mapping of user credentials between systems. We can
make use of this service within Excel Services to retrieve securely
stored connection credentials. The difference between explicitly using
the Secure Store Service and using it indirectly via the Unattended
Service account is that the Unattended Service account is configured
globally for the entire Excel Services application. However, when we’re
explicitly using the Secure Store Service, we can specify which
application ID should be used for each connection.
Configuring the Secure Store Service
Since two of our three options make use of the Secure Store Service, let’s look at how to set it up:
Within SharePoint Central Administration, select Manage Service Applications from the Application Management section.
From
the List of Service Applications, select the Secure Store Service
Application and then, from the Service Applications menu, click Manage.
If
this is the first time the Secure Store Service has been used, we need
to initialize it by clicking the Generate New Key button in the Key
Management section of the Edit menu.
Once the service has been
initialized with a key, we can add a new application for use with our
Excel Services external data store. Before we move on to take this step,
however, I’ll clarify what an application is and how it works within
the Secure Store Service. An application is similar to an Excel
worksheet: along the top of the worksheet are columns that relate to the
properties that are defined by the application. These might include
things like Username and Password but can include practically any
content. Each row represents a mapping for a particular user account or
group of users. For each mapping, values are stored in the respective
columns. When a request is made to the Secure Store Service, the request
will contain details of the application, and using this together with
the SharePoint user credentials, the appropriate row will be selected
and returned.
Now let’s add a new application for Excel Services:
In the Manage Target Applications section, click the New button.
In the Target Application Settings page, enter the Target Application ID as ExcelServicesUnattendedAccount.
Set
the Display Name to the same name as the Target Application ID, and add
an appropriate e-mail address in the Contact E-Mail text box.
Various
Target Applications Types are available when we’re creating
applications, but these can be split into two broad categories:
Individual and Group. Individual types create a one-to-one mapping
between a SharePoint user and a set of properties, or to refer back to
our earlier analogy, each row in our workbook represents only one
SharePoint user. Group types, on the other hand, create a many-to-one
mapping. Effectively, our workbook has only one row, which can be mapped
to any number of SharePoint user accounts or groups.
For
our Excel Services application, we’ll create a Group application, and
this will allow us to map all users to a single set of credentials.
Click Next to proceed to the next step of the process.
Specify
which field will be used by our application. To refer to our earlier
analogy, each field is a column in our worksheet. For our purposes, the
default fields—Windows User Name and Windows Password—are sufficient.
Click Next to move on.
Now
specify which accounts have administrative permissions for this
application. Enter an appropriate username in the Target Application
Administrators picker. As well as specifying administrative users, we
also need to specify which users and groups will use the credentials
that are mapped to our application. In this case, we want everybody to
use the same credentials, so we’ll specify All Users (windows). Click OK
to finish creating our application.
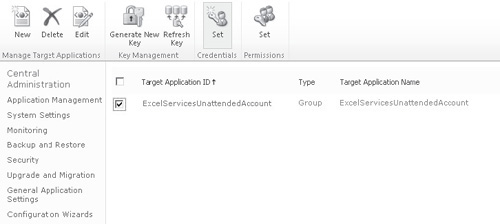
To
set credentials for our application, we must select the application by
clicking the checkbox next to it and then click the Set button in the
Credentials section of the ribbon, as shown:
Enter
details of the testuser account that we created earlier, remembering to
prefix the username with the local computer name (that is, yourcomputer\testuser). Click OK to store the credentials.
Note
Although
we’ve created a group application for use with our Unattended Service
account, we could also have created an Individual application and mapped
the Windows username of the Excel Services service account to our
testuser account. The drawback in doing this, however, is that if the
service account changes, somebody must remember to add the new service
account manually to the application. However, this approach does benefit
from being more secure since only an appropriately configured account
can use our testuser credentials. Our Group application allows our
testuser account to be used by any Windows account.
Now that we’ve set up our Secure
Store Service application, we can take the final step necessary to use
it as our Unattended Service Account within Excel Services.
Navigate to the Manage Excel Services page within Central Administration. Click the Global Settings link.
Scroll
down to the External Data section, and in the Application ID text box,
enter the ID for our Secure Store Service application—in our case, type ExcelServicesUnattendedAccount. Click OK to commit the configuration changes.
Before we can see our unattended service account in action, we need to reconfigure our data connection to use no authentication:
Browse
to the Sample Data Connections library of our sample site and then,
from the context menu, edit the AdventureWorksList30DaysSales connection
file using Excel.
The
Excel client application is opened automatically. In the Security
Notice dialog, click Enable to allow our data connection to execute. A
table of data from our external data source will be displayed. This data
is just for reference purposes; it effectively allows us to see what
our data connection will return when executed.
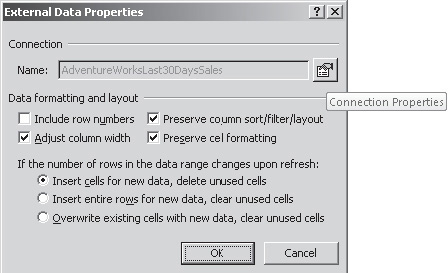
To
modify the data connection properties, from the Data menu click
Properties, and then in the External Data Properties dialog, select the
icon to the right of the Name text box, as shown:
We’ll
be presented with the familiar Connection Properties dialog that we
used earlier when creating our workbook. Switch to the Definition tab,
and then click the Authentication Settings button.
Set the authentication type to None, and then click OK to close the dialog.
As we did when we modified the connection, click Export Connection File to save the changes back to our data connection library.
After
the connection has been exported, click OK to close the dialog, and
then close Excel. Discard the workbook that was automatically created.
We’re now ready to return to our
sample site home page to confirm that our data is still being refreshed
properly. We can use SQL Server Profiler to confirm that connections to
the database are now being made using our testuser account.
You’ve learned how to set up an
Unattended Service account using the Secure Store Service. To use a
specific application ID, the process is practically identical. The only
difference is that in the Connection Properties dialog, rather than
specifying the authentication type as None, the type is set to SSS and
the application ID is entered.